HOW TO GUIDE FOR THE LEGENDS CHASSIS SET-UP JIG
This "How to Guide" gives the Legends car owner
and chief mechanic some insight in to how to make the best use of this very valuable shop tool.
The Guide is written in user friendly terms by a crew
chief/owner and sometimes driver of a legends car.

After some assembly required, the rest is easy. The most important thing to
remember about the set-up jig is that you can use it for many purposes, but you need a
base line from which to start. We have several suggestions, follow the one that best fits your current situation.
You are not sure what you have now, so you're ready to start fresh. Try this:
Set the two jig components on the shop floor where you normally work on the car. Check the bubble levels on each unit to see if the shop floor
is reasonably level. Once you find the right work area, consider marking the
floor for future reference. Next, cut four pieces of 2x4 about six inches in
length. ( If you already have ride height setting blocks, by all means use them. We have four inch and four and a half inch blocks for establishing
our basic ride heights. The goal here is to transfer accurate base line information to the Jigs ride height indicators.) As you know, the
actual width of the 2x4 is 3 5/8 inches. Set the car in the designated area, place the 2x4's on the six inch length with the 3
5/8 side up, at each of
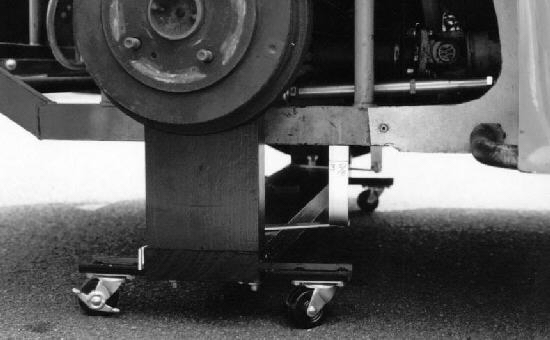
the four corners of the car where the ride height indicators contact the frame (see picture).
 The
picture doesn't show the points clearly but they are the same points that INEX tech inspectors check during a tech inspection.
The kick up point for the front clip and just in front of the rear shock at the
back.
The
picture doesn't show the points clearly but they are the same points that INEX tech inspectors check during a tech inspection.
The kick up point for the front clip and just in front of the rear shock at the
back.
With your race tires in place, stagger set, air pressure set and the spring/shock combination of your choice, lower the car by adjusting the
adjusting rings on each shock until you have all four points touching the 2x4 blocks. Do this carefully, be sure to take out any suspension bind
by shaking the car several times during this process. Once you are confident that you have all four contact points at 3 5/8 inches, quick
jack the front end of the car and place the Jig under the front suspension.
Two things you need to watch for here: swing the ride height indicators out so they are positioned just outside of the frame before you let the car
down on the Jig and make sure that the lower ball joints rest in the uprights when you lower the car.
Now the rear, quick jack the rear. You will probably have to raise up on the left rear tire to get the support
under the axle, do this carefully, then lower the car on to the Jig. We normally loosen all lug nuts before we start and remove both rear wheels
before we put the rear component under the car, it's easier that way.
Pre-position the ride height indicators so they will clear when you lower the
axle onto the Jig.
After lowering the car onto the jig components, bounce the car several times at each end to remove any suspension binding.
The next thing to do is swing the ride height indicators into place at the front and rear. They should touch the frame at the same point that you
used to set the 2x4 blocks. Carefully mark all four ride height indicators with a permanent marker and label this mark as 3 5/8
inches (if you're using the 2x4 blocks).
Now, a suggestion... take the front ride height indicators and carefully add 3/8 of an inch to give you a 4 inch mark, add
7/8 of an inch to the rear indicators to give you 4 1/2 inches.
You can place the driver in the car or the equivalent of the drivers weight in the car to establish your base line, but that's your choice. We
have two base lines, one for road racing and a second for oval track. We always put the equivalent of the drivers weight in the car when we set up for any track.
The next suggestion is for those who like where they are and want to be able to repeat their current set-up with
confidence.
Consider this:
Lets say that you have a set-up on the car that you are very pleased with, maybe you have scales or you borrowed your buddy's scales. In any
case, the car drives well, the corner weights are right where you want them, the cross weight seems to be just right. If you have your race tires
in place and the air pressure is in the ball park, quick jack the car and place the Jig components in place. Put the driver in the car (or equivalent
weight) and swing the ride height indicators into position. With a permanent marker, carefully mark each corner. This would be your base
line, and with the Jig you can always repeat this set-up. You can change springs and adjust your ride heights back to the base line and therefore
have the same corner weights and cross weight. If you make changes at the track and the car works better, put the car on the Jig when you get
back to the shop and record your ride height information for that track and under the conditions that you faced at that event. Keep careful
records and you can repeat that winning set-up whenever you need it.
Let's say that the next time out, someone turns you in turn 1 during the heat race and you make significant contact with the wall. You bend or
break some parts and scramble to get into the feature. You make it, but the car isn't right. Back in the shop, you make a thorough inspection of
the entire car, fix or replace any additional damage, checking to be sure that you don't have a damaged shock.
 Next, put the car on the Jig, add the drivers weight if that is how you do it and swing the ride height indicators into place. Shake the front and
rear as you did to establish the base line and check your marks. If you haven't made any changes and you're off on any corner, you may have
tweaked the frame, a pick up point, or suspension mounting point. Fix the damage yourself or have someone else fix it, then put the car on the
Jig and repeat your set-up with confidence.
Next, put the car on the Jig, add the drivers weight if that is how you do it and swing the ride height indicators into place. Shake the front and
rear as you did to establish the base line and check your marks. If you haven't made any changes and you're off on any corner, you may have
tweaked the frame, a pick up point, or suspension mounting point. Fix the damage yourself or have someone else fix it, then put the car on the
Jig and repeat your set-up with confidence.
We believe that ride heights are critical to good on track performance.
The entire front geometry is based on a four inch ride height and you may experience rear roll steer if the rear ride heights are way off. On
the chassis Jig, you can accurately set ride heights, check trailing arm angles, build in static roll steer by adjusting the wheel base,
long right side for some, maybe long left side for others.
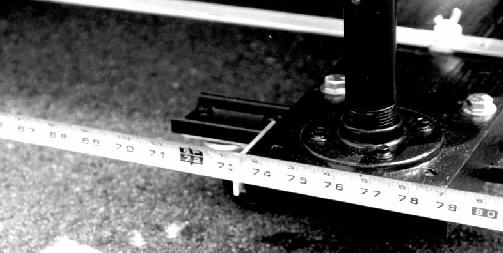
Getting the rear end square is one of the more important features of the chassis Jig. Let's talk about how to do this quickly and accurately. We
are going to take a direct measurement from the rear component toward the front
(on the latest Jig model, we have reversed this so that you measure from the
front to the rear since that is where we are adjusting the trailing arm). Bounce the car at both ends vigorously. Make sure that the
casters are free to move and measure both sides with a good steel tape. Hook the tape on the rear component in the notched aluminum bracket
and measure to the front unit with a similar aluminum bracket.
 In case you are wondering how we can measure from the base of one component to
other component, it's easy; the uprights are centered on the base and the rear axle and lower ball joints self center in their
respective holders. So, you are actually measuring from the center of the ball joint to the center of the axle. Once again, you must bounce the car
vigorously and the casters must be free to move in order get an accurate reading
off the tape.
In case you are wondering how we can measure from the base of one component to
other component, it's easy; the uprights are centered on the base and the rear axle and lower ball joints self center in their
respective holders. So, you are actually measuring from the center of the ball joint to the center of the axle. Once again, you must bounce the car
vigorously and the casters must be free to move in order get an accurate reading
off the tape.
 Since we are measuring from the center of the lower ball joint to the center of the rear axle housing, we need to factor in caster split. If the
caster is equal on each side (as we do on our road race set-up) and you want the rear end square, adjust the trailing arms until you have the
exact same measurement on both sides. If you run some caster split (as we do on our oval track set-up), then we must factor in the effect of caster
split on overall wheel base lengths. As a rule of thumb, for every degree of caster split that you have, add 1/32 of an inch to your right side
measurement.
Since we are measuring from the center of the lower ball joint to the center of the rear axle housing, we need to factor in caster split. If the
caster is equal on each side (as we do on our road race set-up) and you want the rear end square, adjust the trailing arms until you have the
exact same measurement on both sides. If you run some caster split (as we do on our oval track set-up), then we must factor in the effect of caster
split on overall wheel base lengths. As a rule of thumb, for every degree of caster split that you have, add 1/32 of an inch to your right side
measurement.
For example, if you have 3 degrees of positive caster on the right side and 0 degrees of caster on the left, you have 3 degrees of
caster split. If you want the rear end to be square, your right side needs to be 3/32 longer than the left side when measured on the Jig. If you
want to be longer on the left side make the measurements equal and you will have 3/32 longer on the left side. If you want a longer right side as
we sometimes do for our oval track set-up, we first add the 3/32 then add even more
to get the roll out that we want for the track that we are at. The tighter the track, the longer the right side. Larger tracks with big sweeping
turns, not as much right side lead (this is only our opinion of how rear roll
steer can effect the handling of a Legends car).
Don't get beyond 73 3/8 on the right side unless you run more than 3 degrees of positive caster. Since we try to run 0 degrees of positive
caster on the left side. In order to have a little room for tech inspection error, we like to set up the left side wheel base right on
73 inches and the right side at 73 3/16 inches, that gives us a 3/32 longer right side
for our starting point and the room to add up to an 1/8 more at the track.
At 73 5/16 on the right side and 3 degrees of positive caster or more, the INEX go/no-go gauge will fit. For the road course set-up, we go for
as much wheel base as we can get, so we set both sides at 73 3/8 with 3 degrees of positive caster on each side.
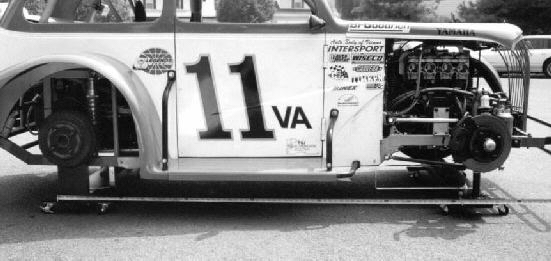
We put our car on the Jig and do all of our set-up right there. We use small 1
ton hydraulic bottle jacks to lift one or more corners of the car at a time to make spring and shock changes, adjust caster or camber,
adjust the panhard bar to control body off-set, and to set the toe. We can check and
adjust tie rod angles, adjust the pinion angle and observe the effect on wheel base. We check and set ride heights and check trailing arm
angles to control rear roll steer.
 Setting the toe is easy
on the Chassis Jig, the car sits supported by the suspension just as if it
were on the ground. Check and set the toe without tire contact patch
distortion effecting the measurement.
Setting the toe is easy
on the Chassis Jig, the car sits supported by the suspension just as if it
were on the ground. Check and set the toe without tire contact patch
distortion effecting the measurement.
As you can see from the design of the Jig components, the goal was to keep it simple, but effective. The ride height indicators are fabricated
from 1/8 aluminum stock. You may want to have several sets of ride height indicators for recording different set-ups at different tracks. You
can get them from us or make them yourself.
 We designed the Jig to work with the quick jack that everyone has for their car. The height of the Jig and casters is therefore dependent on the
quick jack. We do not recommend raising the Jig components to give more under the car clearance. The Jig components have been tested at
the delivered height. Do not exceed this height! We designed the Chassis Jig for use in the shop on smooth concrete
floors. We do not recommend using the Jig at the track unless you have a smooth level concrete pad to work on!
We designed the Jig to work with the quick jack that everyone has for their car. The height of the Jig and casters is therefore dependent on the
quick jack. We do not recommend raising the Jig components to give more under the car clearance. The Jig components have been tested at
the delivered height. Do not exceed this height! We designed the Chassis Jig for use in the shop on smooth concrete
floors. We do not recommend using the Jig at the track unless you have a smooth level concrete pad to work on!
Just in case you missed one point...Always place the front component under the car first and then the rear.
Remove the rear first then the
front.
Set-up suggestions are only our opinion, as you know everyone has their own
way of setting up a race car. If you are exploring and looking for another
opinion, we suggest checking Loosenuts Race Team web
site and you can find them on our Links page.
We hope the HMS Chassis Set-up Jig works as well for you as it does for us. Good luck and good racing!

Race Team
Sponsors
Chassis Jig